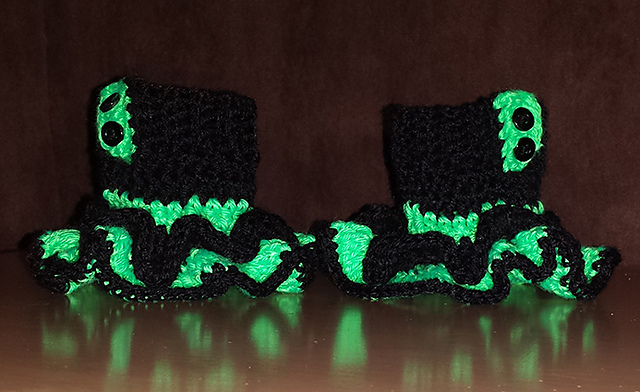
lil Witchy Spats
These cute lil witchy spats make a great accessory for dress-up time!
They can also be used as adult wrist cuffs.
Pair them up with the matching arm warmers for extra fun! 🙂

lil Witchy Spats
You can find ad-free versions at Ravelry and Lovecrafts.
Crochet: Accessories – Spats
Sizes: Children’s :
S = 3-6 (M = 6-8, L = 8-10) years
Circumference: 8” (9 ½”, 10 ½”)/ 20.5cm (24cm, 26.5cm)
Skill Level: Easy
US Terminology
Resources: Abbreviations Chart, Stitch Chart
Gauge: 5 sts x 3 rows = 2.5 cm (1″) with 5.00 mm/US H8 hook (ribbing)
12 sts x 9 rows = 10 cm (4″) with 5.50 mm/US I9 hook
Hooks: 5.00 mm/US H8, 5.50 mm/US I9
Yarn:
Premier Yarns, Big Ball (Worsted #4): black – Amount: 60m/75y/ 30g/ 1oz
Caron, Simply Soft (Worsted #4): neon green – Amount: 60m/75y/ 30g/ 1oz
Other Items Needed: 4 x 1 cm (0.4″) buttons or 2 x 46 cm (18″) matching ribbon, tapestry needle, scissors, stitch markers or piece of yarn
Notes:
Stitches used in this pattern:
Let’s get started… (make 2)
Ribbing:
With 5.00 mm/US H8 hook and MC; ch 6
Rnd 1: Starting in the second ch from hook; sc in each ch to the end, turn [5]
Rnds 2 – 23 (27, 31): ch 1, sc tbl across, turn [5]
Cuff:
Change to 5.50 mm/US I9 hook and turn your work to work in the row ends along the side.
Rnd 1: ch 1, hdc in each row end, sl st join to first sc to begin working in the round [24, 28, 32]
Rnd 2: ch 1, hdc in each st around, sl st join to first st [24, 28, 32]
Change to CC
Rnd 3 – sm: ch 1, *4 hdc, 4 sc* repeat * to * 3 times, sl st join to the first st [24]
Rnd 3 – m: ch 1, 2 sc, *4 hdc, 4 sc*, repeat * to * around to last 2 sts, 2 hdc, sl st join to the first st [28]
Rnd 3 – lg: ch 1, *4 hdc, 4 sc* repeat * to * 4 times, sl st join to the first st [32]
Rnd 4 – sm: ch 1, *4 hdc, 4 sc* repeat * to * 3 times, sl st join to the first st [24]
Rnd 4 – m: ch 1, 2 sc, *4 hdc, 4 sc*, repeat * to * around to last 2 sts, 2 hdc, sl st join to the first st [28]
Rnd 4 – lg: ch 1, *4 hdc, 4 sc* repeat * to * 4 times, sl st join to the first st. [32]
Change to MC
Rnd 5 – sm: ch 1, *4 hdc, 4 sc* repeat * to * 3 times, sl st join to the first st. [24]
Rnd 5 – m: ch 1, 2 sc, *4 hdc, 4 sc*, repeat * to * around to last 2 sts, 2 hdc, sl st join to the first st [28]
Rnd 5 – lg: ch 1, *4 hdc, 4 sc* repeat * to * 4 times, sl st join to the first st. [32]
Rnd 6 – sm: ch 1, *4 hdc, 4 sc* repeat * to * 3 times, sl st join to the first st. [24]
Rnd 6 – m: ch 1, 2 sc, *4 hdc, 4 sc*, repeat * to * around to last 2 sts, 2 hdc, sl st join to the first st [28]
Rnd 6 – lg: ch 1, *4 hdc, 4 sc* repeat * to * 4 times, sl st join to the first st. [32]
Rnd 7: ch 1, 2 sc tfl in each st around, sl st join to first st [48, 56, 64]
Change to CC
Rnd 8: ch 1, 2 hdc in each st around, sl st join to the first st, fasten off [96, 112, 128]
Rnd 9: Reattach CC to the first unused loop from rnd 6; ch 1, 2 sc in each unused loop around, sl st join to the first st [48, 56, 64]
Rnd 10: ch 2, 2 dc in each st around, sl st join to the first dc [96, 112, 128]
(dc is correct. We want this rnd to be a bit higher.)
Change to MC
Rnd 11: ch 1, sc in each st around, sl st join to first st made [96, 112, 128]
Important: Choose either button bands or lace bands to complete.
Button Bands
Left:
Attach CC to the first st of ribbing (RS facing). Using the 5.00 mm/US H8 hook;
Row 1: ch 1, sc in each of the 5 sts of ribbing, sc in the center between the first and second side of the ribbing, ch 1, sc in each of the 5 sts of ribbing on the other side, turn [11]
Row 2: ch 1, 5 sc, sl st in the center st, ch 1, sc, 2 dc in next st, sc, 2 dc in next st, sc, turn [13]
Row 3: sl st in the first 5 sts, ch 1, sk sl st, sl st in the last 7 sts, fasten off [12]
Sew buttons on the opposite side of the 2 sets of 2 dc sts
Right:
Attach CC to the first st of ribbing (RS facing). Using the 5.00 mm/US H8 hook;
Row 1: ch 1, sc in each of the 5 sts of ribbing, sc in the center between the first and second side of the ribbing, ch 1, sc in each of the 5 sts of ribbing on the other side, turn [11]
Row 2: ch 1, sc, 2 dc in next st, sc, 2 dc in next st, sc, sl st in the center st, ch 1, 5 sc, turn [13]
Row 3: sl st in the first 7 sts, ch 1, sk sl st, sl st in the last 5 sts [12]
Lace Band (for both)
Attach CC to the first st of ribbing (RS facing). Using the 5.00 mm/US H8 hook;
Row 1: ch 1, sc in each of the 5 sts of ribbing, sc in the center between the first and second side of the ribbing, ch 1, sc in each of the 5 sts on the other side of the ribbing, turn [11]
Row 2: ch 1, sc, 2 dc in next st, sc, 2 dc in next st, sc, sl st in the center st, ch 1, sc, 2 dc in next st, sc, 2 dc in next st, sc, turn [15]
Row 3: sl st in first 7 sts, ch 1, sk sl st, sl st in the last 7 sts, fasten off [14]
Finishing:
Button Bands: Sew buttons on the opposite side of the 2 sets of 2 dc sts of row 2.
Lace Bands: Weave matching cord through the sets of the 2 dc in row 2 the same way you would for shoes.
Enjoy!
Thank you for your interest in my work.
© Lori-Anne Carr, wravenstorm.com/wravenstorm.ca, 2022

