
A Simple Roll-up Case
This pattern creates a simple roll-up case for your crochet hooks and knitting needles. It is great for organizing and transporting your tools. As written, the case will hold hooks and needles up to 30cm (12″) long. The pattern is easily adjusted to accommodate shorter or longer hooks and needles.


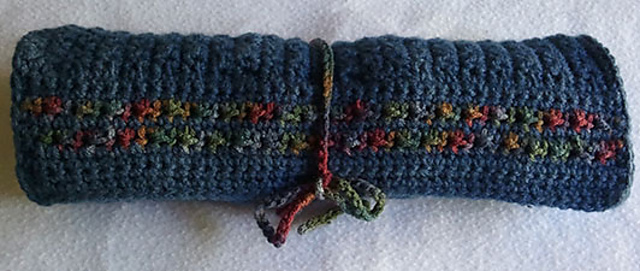
A Simple Roll-up Case (Crochet Hooks/Knitting Needles)
You can find ad-free versions at Ravelry and Lovecrafts.
Crochet: Bags, Baskets, Cozies
Sizes: Finished size is 30cm (12″) x 17cm (43″).
Skill Level: Easy
US Terminology
Resources: Abbreviations Chart, Stitch Chart
Gauge: 15 sts x 14 rows = 10cm (4″) in pattern sc/hdc
Hooks: 4.00mm (US G6)
Yarn: Any worsted weight (medium 4), 2 colours.
Main colour: Red Heart Super Saver (#4 medium): Windsor Blue – Amount: 116m/ 180y/ 100g/ 3.5oz
Contrast colour: Red Heart Super Saver (#4 medium): Williamsburg Print – Amount: 111m/ 125y/ 70g/ 3oz
Other Items Needed:
- scissors
- tapestry needle
Stitches used in this pattern: ch, sc, hdc
Notes:
** When creating the pattern rows, the sc row must be on the RS and the sc hdc row must be on the WS.
Let’s get started on your simple roll-up case…
cover:
Using main colour: ch 47
Row 1: (RS) Starting in second ch from hook, sc to end, ch 1, turn [46]
Rows 2 and 3 create the textured pattern for the case.
Row 2: (WS and Pattern row) *sc, hdc*, repeat * to * across, ch 1, turn [46]
Row 3: (RS and Pattern row) sc across, ch 1, turn [46]
Rows 4 – 43: Repeat rows 2 and 3 (20 repeats/sets, ending with row 3 and RS facing.)
Do not fasten off.
End Flap:
Continuing from where you left off for the cover, but working around the side:
Row 1: 2 sc in the last st of row 43 (you should now have 3 sts in that st),
41 sc evenly along the side (1 sc in each row end), sc in the corner,
ch 1, turn [44]
Row 2: sc across, ch 1, turn [44]
Row 3: sc across, ch 1, turn [44]
Rows 4 and 5 create the same textured pattern as above.
Row 4: (WS and Pattern row) *sc, hdc*, repeat * to * across, ch 1, turn [44]
Row 5: (RS and Pattern row) sc across, ch 1, turn [44]
Rows 6 – 9: Repeat rows 4 and 5 (2 repeats/sets, ending with row 5: RS facing).
Fasten off and weave in loose ends. [44]
Closing Flap:
Reattach main colour to the opposite end – RS facing, right top corner
or the side opposite the end flap.
Row 1: ch 1, 44 sc evenly across (1 sc in the end of each row), ch 1, turn [44]
Rows 2 – 3: sc across, ch 1, turn only after row 2 [44]
Rows 4 and 5 create the same textured pattern as above
Row 4: (WS and Pattern row) Change to contrast colour; ch 1, *sc, hdc*, repeat * to * across, turn [44]
Row 5: (RS and Pattern row) Change to main colour; ch 1, sc across, turn [44]
Rows 6 -7: Repeat rows 4 and 5 [44]
Rows 8 – 10: With main colour, sc across, ch 1, turn [44]
Rnd 11 is worked around the flap to make it more uniform.
Rnd 11: 44 sl st across, ch 1
Working around the corner to side: 10 sc evenly (1 sc in each row end),
sc in next 46 sts, 8 sc evenly (1 sc in each row end), ch 1,
44 sl st across the end flap, ch 1, 8 sc evenly (1 sc in each row end),
sc in next 46 sts, 10 sc evenly (1 sc in each row end), ch 1,
sl st into first st, fasten off and weave in ends [217 + 4 ch)
Strap #1
Using contrast colour, ch 47
Row 1: Starting in second ch from hook: sc across, ch 1, turn [46]
Rows 2 – 3: hdc across, ch 1, turn [46]
Row 4: sc across, ch 1, turn [46]
The next row gives the strap strength and keeps it from overstretching.
Row 5: sl st across, fasten off and weave in ends. You will use the main
colour for sewing [46]
Strap #2 (make 2)
Using contrast colour: ch 47
Row 1: Starting in second ch from hook; sc across, ch 1, turn [46]
Row 2: sc across, ch 1, turn [46]
The next row gives the strap strength and keeps it from overstretching.
Row 3: sl st across, fasten off and weave in ends. You will use the
main colour for sewing. [46]
Tie
Tightly ch 120 sts. Fasten off and weave ends into the chain. [120]
Fold the tie so it has 40 ch on one side and 80 ch on the other side.
Attach it to the closing flap, centered and one row up from the edge , excluding the sl st edge.

Finishing:
Strap #1: Using main colour for sewing, and with WS facing:
Sew strap #1 along the bottom edge, between the flaps. Only sew the two sides and the bottom edge of the strap to the cover to form a pocket. Take care to not pucker your pocket. I stitched mine about 1/4″ from the bottom so it wouldn’t be visible when the case is rolled up.
Strap #2: Using main colour for sewing, and with WS facing:
Sew one strap #2 across the cover, between the flaps at about 4 to 4 1/2″ from the bottom, and the other at about 7 to 7 1/2″ from the bottom. Only sew the 2 sides of each strap to the cover to form a brace.
Creating Slots: Using main colour; secure each brace about every 1 to 1 1/2″. This will create the slots for your hooks/needles. It isn’t necessary to repeat this step for the bottom pocket, but you can if preferred.
Brief closing notes:
To make this case to hold longer hooks, increase the number of horizontal rows, then increase the number of flap stitches simply by sc evenly across the sides to match. Then adjust the positioning of the braces or add a third brace.
The same applies for shorter hooks, but in reverse. Simply decrease the number of horizontal rows and sc evenly across the sides to match.
Alternate method: Add horizontal pattern rows across the top edge of the existing case once the cover and flaps are completed, and reposition the tie and braces to the proper positions as needed.
** When creating the pattern rows, the sc row must be on the RS and the sc hdc row must be on the WS.
Now just add your hooks or needles and roll up!
Thank you for your interest in my work.
© Lori-Anne Carr, wravenstorm.com/wravenstorm.ca, 2022
